In order to set off on the right foot, we will use this first session to talk about a few concepts and extra tools that will make illustration and design much easier and precise, as well as a good look at the software under the hood, in order to make it perform to our needs and maximize its potential. Some of this information will likely come across as boring, but believe me – a digital artist who doesn’t fully understand the inside and outs of the software we use will not be as valuable nor successful as one who treats their tools seriously and with care. So take the time to watch the videos and gain more control of these tools – or they might just control you.
We are going into the great world of digital design with Adobe Illustrator. This program is an amazing tool used to create and edit vector-based elements, but is not limited to just that. Before we get too far into making artwork, let’s get clear on what exactly vector art is, and how it differs from pixel-based images, such as those created in Photoshop.
Let’s look at pixels first. Pixel images are constructed using a collection of points or dots in which each pixel has it’s own address and light color assignment (RGB or Red, Green and Blue.) Think of them as tiny single illuminated blocks that when put together make one large, and complete, image. Because the human eye is not capable of seeing each individual pixel, we see a picture with smooth gradations. Digital photographs are one common form of pixel based art.
The number of pixels an image contains is linked to the resolution of the image. This resolution speaks to the amount of detail an image contains. For printing, images should be at least at a resolution of 300dpi (dots per inch), otherwise the eye will notice the pixels, and the image will lose definition. The television or computer monitor displays images at a much lower resolution: 72ppi (pixels per inch.) Therefore, as a general rule, images found on websites are not suitable for printing.
Because pixel based images have set resolutions they can not be enlarged without losing quality. They are resolution dependent. The image below of beer bubbles shows a photo at 100% and then zoomed in to show the individual pixels.
Common files types that use pixels: jpg, png, tiff, bmp, raw, gif
![]()
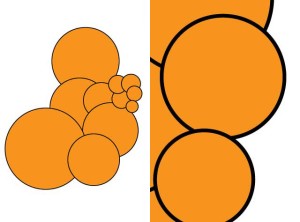
Now, about vector images. Vector graphics (also called geometric modeling or object-oriented graphics) is the use of geometrical primitives such as points, lines, curves, and polygons, which are all based upon mathematical equations to represent images in computer graphics. One key aspect of vector art is key for printing. Since the art is made from a series of mathematical points it will print very crisp no matter how much the art is re-sized. You can take the same vector logo and print it on a business card or blow it up to billboard size and keep the same crisp quality. In contrast a raster graphic would blur incredibly if it were blown up to that scale. Or if a vector file is used in an animation program, it can be scaled as large as necessary without losing quality. They are resolution independent. You can see that the image drawn below uses points and curved lines, and that even though the shape is significantly enlarged, it doesn’t lose clarity.
Common vector file types: eps, pdf, ai, svg
Vector files can be saved as any of the pixel formats. When this happens, the mathematical information is lost.

Anya Smilanick does a pretty good job at explaining this in this video:
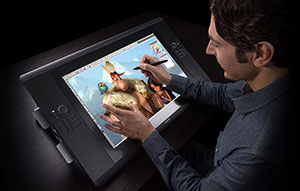
 Today’s digital artist has a world of tools at his/her fingertips, but perhaps the most revolutionary addition has been the graphics tablet. This input device allows the artist to work in a hand-drawn fashion, similar to how a traditional artist draws with a pen or pencil, paints with a brush, etc.
I HIGHLY recommend to all my students the acquisition of one of these devices. (I say acquisition because they make great “back to school” or early xmas gifts from mom or dad…) Is one required for this class? No, but again, HIGHLY recommended. Look at the way you hold your mouse. Is that a normal position for us human beings? Only when you play shuffleboard or petting a small dog’s head. When we hold a pen or pencil, our hands are a little more at ease. We can rest them on their side while just using the fingertips to write or draw. This change in hand posture is incredibly effective in relieving carpal tunnel syndrome and RSD, which disables artists way more than you might realize. Even worse for your hand and arms are TRACKPADS! Oh please, please, please don’t try to do anything related to digital art/design by using your laptop’s trackpad. Please!
But the real magic is in the interaction between some of our artistic applications and the tablet/stylus. Photoshop, Painter, Illustrator and After Effects are just a few of the programs that really take advantage of the graphics tablet. Pressure sensitivity, amazing curves, ease of use… if you’ve never tried one, it will blow your mind.
So, buy one, borrow one, beg for one… just really do your best to get your hands on one of these. There will be material I cover in class that takes advantage of some of the features found only in a tablet, but it will not affect your grade. But seriously… this is a class with the word “Illustrate” in it. Can you truly illustrate with a mouse? Or even worse, a TRACKPAD!!??
 Search for them online, or check out locally at Best Buy or the University Bookstore. You don’t need a huge one, but the smallest are pretty darn small. A 4×5 is OK, 6×8 ideal, 9×14… better have a HUGE desk. The best tablets out there are made by WACOM. Their bottom line is good for entry level to intermediate, and if you are serious about building your artist studio, get their Intuos line – much better hardware in those tablets. And if you feel you are able to pull off a miracle, look at the Cintiq models – you get a display built right into the tablet surface.
Wacom interviewed illustrator Guy Shield from Melbourne, who´s passion is scenic storytelling. He developed an undying love for image making and a successful career in publishing and illustration.
This is an online class, and aside from having a constant and reliable internet connection, a commitment to the time this class requires should be at the fore front of your mind as your navigate through the course work each week. Remember the old rule of thumb, that there is a minimum of 2-3 hours of course work per credit, per week. So in a given week, expect to spend at least 6 hours on this class.
Since we will not be in a face-to-face environment, it becomes easy to slack off and procrastinate, as I won’t be able to see you twice a week to keep you on your toes. It’s important to claim responsibility in whatever ways work best for you in order to establish a calendar with due dates and assignments, know what resources you have for help either on campus or off, and how to best contact your instructor.
As this is an art studio course, you will absolutely need to invest ample time into simply practicing your line work and getting to really know your tools. It is very easy to spot the students who wait until the last minute, skip videos, and don’t take their learning seriously – no one really wants to be that person.
Lastly, stay away from the impulse of making up excuses for not holding up your end of the contract here. I’ve heard and seen it all, and to be honest, I appreciate hearing that you slipped behind and are trying to catch up more than the silly things made up to mask procrastination or distraction. We all get very busy and overwhelmed, so many of us deal with depression, etc. We are here to listen and provide advice when things get rough, but it’s also important to recognize these times and figure out productive ways to keep moving forward and accomplish our goals.
David Litchfield talks with us about his successful discipline of drawing every day. Please watch.
Take a few minutes to watch this short film on managing your time as an online student.
Below are a number of tutorials I have created to get you started with Illustrator. Please spend the time with these videos, and do your best to follow along. Starts off a little boring, but like I stated, the best digital artists seriously know their domain and tool sets. Let’s hope you have that same attitude!
• Illustrator Preferences
Boring but necessary basics of managing Illustrator and making it work best for you.
• Interface & Artboards
Here we explore the menus, palettes and windows of Illustrator, as well as an intro to art boards.
• Artboards in Detail
Let’s get to understand art boards a bit better, helping us manage our workflow and projects.
